Welcome to Amit Rubber Products — Automotive Rubber Parts Manufacturer Since 1980 [email protected] +91-9871861285
0%

Choosing the right Front Engine Mounting is not just a matter of matching bolt holes. The mount must support engine weight, control movement under acceleration, and reduce vibration reaching the cabin. A part that looks correct can still differ in stiffness, rubber formulation, or hydraulic design. Those differences may show up as a steering-wheel tremor at idle, a clunk during gear changes, or excess engine movement under load.

SAE International’s technical publications on vehicle vibration and noise, vibration, and harshness (NVH) offer engineering context for how vibration travels through vehicle structures. Market reports from firms such as Grand View Research track the wider automotive engine-mount market, but market growth does not tell you which mount fits a specific vehicle. Fitment data, manufacturer specifications, and inspection of the old mount matter more. There is no universal replacement interval; heat, oil leaks, road conditions, and driving habits all affect service life.

A reliable selection process starts with the vehicle’s exact year, make, model, engine, and transmission. Then check the part number, mounting points, and manufacturer guidance. As automotive engineer John C. Dixon’s work on vibration and isolation suggests, controlling vibration requires attention to the whole system—not just one component. That is a paraphrase of an engineering principle, not a verified direct quotation about engine mounts. Small details count. The following seven tips help you compare mount construction, confirm compatibility, and avoid a replacement that fits on paper but performs poorly on the road.
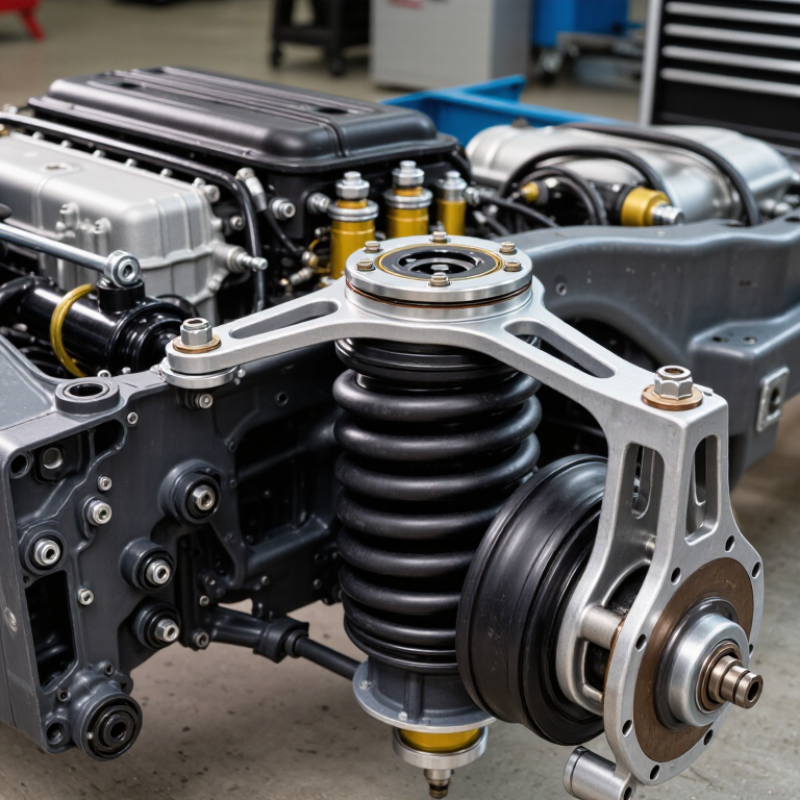
7 Tips to Choose the Right Front Engine Mounting?

Front Engine Mounting: Function, Structure, and Basic Types

Front Engine Mounting: Function, Structure, and Basic Types

A front engine mount supports the engine and connects it securely to the vehicle frame. It carries static weight and absorbs movement during acceleration, braking, and uneven roads. It also limits vibration before it reaches the cabin. During workshop inspections, I look for cracked rubber, fluid leakage, loose bolts, and uneven gaps. A worn mount may cause clunks, harsh vibration, or visible engine movement.

Most front mounts use rubber, hydraulic, or solid construction. A typical assembly includes a steel bracket, an elastomer cushion, mounting bolts, and sometimes a fluid-filled chamber. Rubber mounts are simple and economical. Hydraulic mounts control vibration more effectively at different engine speeds. Solid mounts offer strong movement control, but they can transmit more noise. Each design has a different balance.

When choosing the right mount, check seven details: engine position, load direction, material, mount type, bolt alignment, clearance, and torque requirements. Compare the original dimensions carefully. Look for matching stud spacing and bracket angles. Measure the old part before ordering. Confirm that nearby hoses and wiring will not rub against the mount. I have seen small alignment errors create serious stress after installation. That lesson is easy to overlook. Do not judge quality by appearance alone. A quiet idle helps, but road testing reveals more. When results seem uncertain, inspect the entire mounting system rather than replacing one part blindly.

Assess Vehicle Compatibility and Engine Mounting Requirements

Choosing the right front engine mount starts with exact vehicle identification. NHTSA’s VIN-decoding guidance confirms that a modern vehicle identification number contains 17 characters and can help identify vehicle details. Still, a VIN alone may not reveal every engine or drivetrain variation. Check the year, model, engine size, transmission, drivetrain, and production date against the vehicle’s service information. A mount for a similar model can look right but sit at a different angle.

Tip: Compare the original mount’s shape, bolt pattern, stud position, and rubber orientation with the replacement specification. Note whether the vehicle uses hydraulic, solid-rubber, or electronically controlled mounts. These designs respond differently to vibration and load. If the old mount is collapsed, its worn position can mislead you. It is worth checking the opposite mount and transmission mount too; I have seen a new part blamed for movement caused elsewhere.

Before ordering, confirm the engine code and any mid-year production changes using a parts catalog or repair manual. Record the part number from the removed mount, but treat it as a cross-check, not proof. Manufacturer fitment data and a qualified technician’s inspection can clarify uncertain applications. Measure carefully. A few millimeters can affect alignment, clearance, and vibration at idle.

Compare Mount Materials, Load Ratings, and Vibration Control

Choosing a front engine mount is a balance between material, load capacity, and vibration control. Rubber mounts can absorb small engine movements and road shock, while hydraulic designs use fluid chambers to reduce vibration at selected frequencies. Neither material is universally better. Check the mount’s temperature range and fluid compatibility, then compare its tested load rating with the vehicle’s actual mounting loads. SAE J1085 provides a framework for evaluating engine-mount performance; ask suppliers for test conditions, not just a single capacity figure.

Tip: Compare like with like. A 10-kilogram load creates about 98 newtons of static force under Earth’s gravity, but engine torque adds changing loads that a static figure cannot represent. Confirm whether ratings describe static, dynamic, or ultimate load. Also check displacement under load: a mount that is too soft may let the engine contact nearby parts; one that is too stiff can pass more vibration into the cabin.

For material checks, ASTM D2240 measures rubber hardness, but hardness alone does not predict isolation or service life. Look for temperature, fatigue, and vibration test results alongside the durometer reading. Match the mount to the engine’s operating conditions and inspect neighboring mounts before replacement. A worn bracket can distort the result. That detail is easy to miss.

Check Quality, Fitment, and Installation Conditions

S&P Global Mobility reported that the average age of light vehicles in the United States reached 12.6 years in 2024. Older vehicles may have worn mounts, but age alone does not confirm a fault. Inspect the rubber for cracks, separation, or oil contamination, and check whether the bracket is bent. Compare the replacement part’s dimensions and mounting points with the removed unit. Correct fitment matters: a mount that sits under tension can transmit vibration instead of absorbing it. Small differences count.

Tip: Check quality and fitment. Look for clear material and application details, intact rubber, and clean, even bonding. Match the vehicle year, engine, and drivetrain configuration using reliable service information. Do not choose by appearance alone.

Tip: Check installation conditions. Support the engine securely before removing a mount, and follow the vehicle maker’s torque specifications. Tighten fasteners in the specified sequence, with the engine positioned as directed. A slight shift can make alignment awkward; that is easy to overlook. After installation, listen for clunks and check for excessive vibration at idle. If symptoms remain, inspect other mounts and nearby exhaust or driveline components. An engine mount is only one possible cause.

Verify Performance After Installation and Plan Regular Maintenance

After fitting a front engine mount, inspect it with the engine off. Check fastener torque against the vehicle service manual, confirm brackets sit squarely, and look for trapped hoses or wiring. Then start the engine and listen at idle. A dull knock, new cabin shake, or visible engine movement under gentle load can signal incorrect seating or another worn mount. Small details matter.

Use a repeatable check: compare vibration before and after installation at the same engine speed, with the vehicle safely stationary. ISO 2631-1:1997 describes whole-body vibration evaluation over 0.5–80 Hz; a workshop vibration meter can help identify changes that a driver may miss. This is a measurement framework, not a pass/fail limit for engine mounts. Also record mileage, symptoms, and readings. The notes may be imperfect, but they make later comparisons more useful.

Plan inspections around service intervals and whenever unusual vibration, clunking, or fluid leakage appears. Examine nearby mounts too, since one new mount cannot correct movement caused by another failed part. Recheck fasteners only as the service manual directs; repeated tightening can damage threads. After a short road test, inspect again for contact marks and listen during acceleration and deceleration. Don’t ignore a slight new buzz. It may be harmless, or the first clue that alignment needs another look.

7 Tips to Choose the Right Front Engine Mounting? - Verify Performance After Installation and Plan Regular Maintenance

Tip Selection Focus What to Check Verification After Installation Maintenance Plan
1 Confirm vehicle fitment Match the vehicle’s year, make, model, engine, drivetrain, and mount position. Compare the replacement part with the removed mount and check mounting points. Confirm the mount sits flush, fasteners align without force, and no bracket or nearby component is contacting the mount incorrectly. Recheck the area during routine servicing and whenever engine vibration or unusual movement is reported.
2 Choose the correct mount design Check whether the vehicle uses a standard rubber, hydraulic, or electronically controlled mount. Use the design specified for the application. Check that electrical connectors, fluid lines, and vacuum connections, if fitted, are connected and routed as designed. Inspect hoses, connectors, and the mount body for damage or leaks during scheduled service.
3 Assess construction and materials Look for sound bonding between rubber and metal, cleanly formed brackets, and no cracks, separation, corrosion, or shipping damage. After fitting, check for visible distortion, pinching, or metal-to-metal contact under normal operating conditions. Include a visual condition check in periodic inspections, especially after exposure to oil or other fluid leaks.
4 Use the correct installation procedure Follow the vehicle service information for support points, installation sequence, fastener replacement, and specified torque values. With the engine safely supported during work, confirm fasteners are tightened to the specified values and the mount is not preloaded or twisted. Do not retighten by guesswork. Investigate any looseness or movement using the service procedure for the vehicle.
5 Check related mounts and components Inspect other engine and transmission mounts, brackets, exhaust connections, and nearby hoses for wear or contact marks. Start the vehicle and check for abnormal vibration, knocking, or contact. Compare behavior with the vehicle’s normal operating condition. Inspect related parts when symptoms return; replacing one mount may not resolve wear elsewhere in the mounting system.
6 Verify performance under normal use After installation, check idle quality, gear engagement, and engine movement during normal, safe operating conditions. Confirm there is no new vibration, clunking, warning light, fluid leak, or interference. If symptoms persist, inspect for fitment or related faults. Monitor for changes in noise or vibration after the repair and have new symptoms diagnosed promptly.
7 Plan condition-based maintenance Mounts do not have one universal replacement interval. Service life depends on vehicle use, environment, condition, and manufacturer guidance. Record the installation date and findings. Check again after the repair has been used under normal driving conditions. Inspect at intervals recommended by the vehicle manufacturer and during routine servicing. Replace a mount when inspection confirms deterioration or failure.

FAQS

What details should I check before choosing a front engine mount?

Confirm the vehicle’s year, model, engine, transmission, drivetrain, and production date. A VIN helps, but may not show every variation.

How can I compare the replacement mount with the original?

Compare its shape, bolt pattern, stud position, and rubber orientation. Check nearby clearance, too. A few millimeters can matter.

Are rubber and hydraulic mounts interchangeable?

Not always. Rubber absorbs small movements, while hydraulic designs reduce vibration at selected frequencies. Match the design to the vehicle specification.

What load information should I request?

Ask whether the rating is static, dynamic, or ultimate, and request test conditions. A single capacity number can be misleading.

Does rubber hardness prove that a mount will perform well?

No. Hardness is only one clue. Temperature, fatigue, and vibration testing also matter.

What should I inspect after installation?

With the engine off, check fastener torque against the service manual. Confirm brackets sit squarely and hoses or wiring are not trapped.

How can I tell whether the new mount is seated correctly?

Listen at idle for a dull knock or new cabin shake. Gentle engine movement may point to poor seating or another worn mount.

How should I track vibration changes?

Compare readings at the same engine speed, with the vehicle safely stationary. Record mileage and symptoms. The notes may not be perfect, but they help.

When should I inspect the mounts again?

Check them at service intervals and after unusual vibration, clunking, or fluid leakage. Reinspect after a short road test. Watch for contact marks.

Conclusion

Choosing the right Front Engine Mounting starts with understanding its role in supporting the engine, maintaining alignment, and reducing vibration. Begin by checking your vehicle’s specifications, engine configuration, and mounting requirements to ensure the part is compatible. Then compare available materials, load ratings, and vibration-control characteristics, selecting an option suited to the vehicle’s operating conditions and expected demands.

Before installation, confirm the mount’s dimensions, connection points, overall quality, and fitment, and make sure installation conditions are appropriate. Once fitted, check that the engine sits securely and that vibration or movement has not increased. Regular inspections can help identify wear, looseness, or damage early, supporting reliable performance and helping determine when maintenance or replacement may be needed.

Evelyn

Evelyn

Evelyn is a highly experienced marketing professional dedicated to helping businesses understand, evaluate, and make the most of innovative products and solutions. With a strong combination of market insight, product knowledge, and clear communication skills, she regularly contributes expert......